Mosquito Magnet® Commercial Pro
Pro Housing Breakdown
Inside the housing
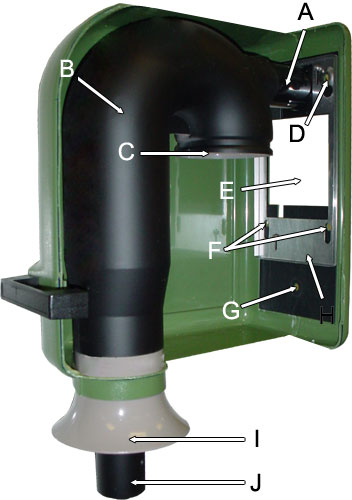
- CO2Tube - This is where the CO2 flows through the housing to come out the Plume Tube (J)
- Outer Tube - This is the path the mosquitoes travel through on their way to the net after they are vacuumed into the trap.
- Net Holder - This oval shaped opening is where you attach the Net.
- Power Pack Bolt Slot (Upper) - When assembling the trap this is where the upper bolts on the Power Pack get locked into place when you slide the Slide Plate (H) down.
- Large Fan Opening - This is the location of the Large Fan. Where it generates the vacuum.
- Power Pack Bolt Slot (Lower) -
When assembling the trap, insert the lower bolts protruding from the
power pack into the openings (F). The upper bolts (D) are automatically
locked into place when you slide the Slide Plate (H) down. Then apply the wing nuts and secure tightly.
- Pedestal Adapter Screw Hole - After the Slide Plate (H) is down and the wing nuts have been securely tightened to the Lower Bolts on the Power Pack, insert the large screw to secure the housing to the Pedestal Adapter.
- Housing Slide Plate - This is used to secure the Housing to the Power Pack.
- Trumpet - This is where you can feel the vacuum and the mosquitoes are drawn into and sucked into the Net. This is where you would do the tissue test
to check the vacuum. Using a small piece of tissue, about the size of a
dime. Hold the tissue under and about a half inch into the trumpet and let it go. The piece of tissue should be pulled into the net. If it does not, check our troubleshooting steps for this issue.
- Plume Tube - When the CO2 is forced out of the CO2 output tube on the Power Pack, and flows through the CO2 tube into the Pro Housing it then comes out the plume tube. As the CO2
flows past the Attractant Carrier, there are air holes on the attractant carrier that allow the CO2 to flow through and pick up the attractant as it flows out of the plume tube.
